文章笔记: 阮一峰 Redux 教程 (一) 阮一峰 Redux 教程 (二) 阮一峰 Redux 教程 (三)
Redux 基础
Redux 设计思想
1. Web 应用是一个状态机, 视图与状态是一一对应的
2. 所有的状态保存在一个对象里面
Redux 工作流程
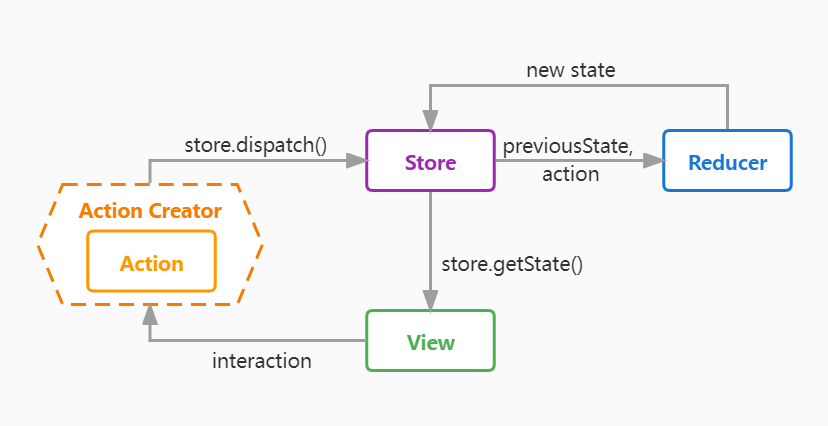
Store
store 是保存数据的容器, 一个应用只能有一个 store. 通过
store.getState()可以获得当前时刻的容器状态 (state, 类似于容器的快照), 而视图则根据 state 情况展现.Action
当用户操作视图, 产生 action, 例如增加 5 次计数:
1
2
3
4
5
{
type: 'ADD_COUNT',
payload: 5,
}
// type, payload 都是一种命名规范视图通过
store.dispatch({type: 'ADD_COUNT', payload: 5})将 action 发送给 store.action creator 是帮助生成 action 的函数, 例如:
1
2
3
4
5
6
function addCount(count) {
return {
type: 'ADD_COUNT',
payload: count,
}
}这样视图发送 action 的方式就变成:
store.dispatch(addCount(5))Reducer
store 接收到 action 后, 必须给出一个新的 State 去指导视图的变化. store 会将当前的 state 与接收到的 action 一起交给 reducer 处理, reducer 处理后会返回 store 一个新的 state:
1
2
3
4
5
6
7
8
9
10
11
12
13
14
15
const defaultState = 0;
function reducer (state = defaultState, action) {
switch(action.type) {
case 'ADD_COUNT':
return state + action.payload;
default:
return state;
}
}
// store.dispatch 的模拟:
const newState = reducer(store.getState(), {
type: 'ADD_COUNT',
payload: count,
});
store <--(update)-- newState;reducer 是纯函数, 即, 只要是同样的输入, 必定得到同样的输出. 因此:
不得改写参数, 即: reducer 不改变 state, 只生成全新的 state
不能调用系统 I/O 的 API
不能调用
Date.now()或者Math.random()等不纯的方法, 因为每次会得到不一样的结果* reducer 的命名: reducer 可以作为数组的 reduce 方法的参数
1
2
3
4
5
6
7
8
9
10
11
12
13
14
const actions = [
{ type: 'ADD', payload: 0 },
{ type: 'ADD', payload: 1 },
{ type: 'ADD', payload: 2 },
];
const reducer = (state = 0, action) => {
switch(action.type) {
case 'ADD':
return state + action.payload;
default:
return state;
}
};
const total = actions.reduce(reducer, 0); // 3
createStore
store.dispatch 可以自动触发 reducer 的执行, 可见创建 store 的时候需要知道 reducer:
1
2
import { createStore } from 'redux';
const store = createStore(reducer, initialState[optional]);监听
工作流程图中还有一点没有明确, 当 store 从 reducer 处获得新的 state 完成更新后, 是如何通知视图变化的?
这就需要通过
store.subscribe()设置监听函数, 让视图响应 store 的变化:1
2
3
4
5
6const unsubscribe = store.subscribe(() =>
const newState = store.getState();
component.setState(newState); // 假设 react
);
// 接触监听
unsubscribe();
Redux API 拆解
createStore 的简单实现
store 主要输出了 getState, dispatch, subscribe 三个功能
1
2
3
4
5
6
7
8
9
10
11
12
13
14
15
16
17
18
19
20
21
22const createStore = (reducer, initState) => {
let state = initState;
let listeners = [];
const getState = () => state;
const dispatch = (action) => {
state = reducer(state, action);
listeners.forEach(listener => listener());
};
const subscribe = (listener) => {
listeners.push(listener);
return () => {
listeners = listeners.filter(l => l !== listener);
}
};
dispatch({});
return { getState, dispatch, subscribe };
};combineReducers
reducer 通常非常庞大, 可以基于 store 对象的属性进行拆分, 并通过 combineReducers 合并
例如对于一个结构为
{ a: value1, b: value2, c: value3 }的 store, 其 reducer 可以为:1
2
3
4
5
6
7
8const reducer = (state, action) => {
return {
a: reducerA(state.a, action),
b: reducerB(state.b, action),
c: reducerC(state.c, action),
}
};
// reducerA, reducerB, reducerC 分别为其 a, b, c 属性的专属 reducer用 combineReducers 方法就变成:
1
2
3
4
5
6import { combineReducers } from 'redux';
const reducer = combineReducers({
a: reducerA,
b: reducerB,
c: reducerC,
});如果 reducer 与属性名称命名一致, 则简化为:
1
2
3import { combineReducers } from 'redux';
const reducer = combineReducers({a, b, c});
// 注意: 这里的 a, b, c 既是 store 对象的属性名称也是属性对应 reducer 方法的名称由此, combineReducers 的简单实现如下:
1
2
3
4
5
6
7
8
9
10
11const combineReducers = reducers => {
return (state = {}, action) => {
return Object.keys(reducers).reduce(
(nextState, key) => {
nextState[key] = reducers[key](state[key], action);
return nextState;
},
{}
);
};
};
Redux 异步处理
异步处理: Action 发出, 过段时间再执行 Reducer.
中间件
中间件用于改造 store.dispatch 方法, 在发出 Action 和执行 Reducer 这两步之间, 添加其他功能:
1 | import { createStore, applyMiddleware } from 'redux'; |
中间件编写说明:
1 | const someMiddleware = ({ dispatch }) => next => action => { |
中间件的执行次序有讲究, 因为 applyMiddleware 将所有中间件组成一个数组, 依次执行.
applyMiddleware 简化源码如下:
1 | function applyMiddleware(...middlewares) { |
redux-thunk
redux-thunk 使 store.dispatch 可以接收函数, 处理如下异步场景:
1 | // action creator |
redux-thunk 的实现:
1 | const thunk = ({ dispatch }) => next => action => { |
React-Redux
connect
React-Redux 将所有组件分成两大类: UI 组件 (presentational component) 和容器组件 (container component). UI 组件负责呈现视图, 容器组件负责管理数据和逻辑.
React-Redux 通过 connect 方法从 UI 组件生成容器组件:
1 | // UI 组件 Counter |
1 | // 容器组件 VisibleCounter |
mapStateToProps
mapStateToProps 支持两个参数, 第一个是 state, 第二个是容器组件的 props.
mapStateToProps 订阅 Store: 每当 state 更新的时候, 则自动重新计算 UI 组件的 props 参数, 从而触发 UI 组件的重新渲染.
connect 方法如果省略 mapStateToProps, 则 UI 组件不会订阅 Store.mapDispatchToProps
mapDispatchToProps 可以是函数, 也可以是对象.
mapDispatchToProps 为函数时, 也支持两个参数, 第一个是 store.dispatch, 第二个是容器组件的 props.
mapDispatchToProps 为对象时, 键值为 action creator 函数, 返回的 action 会由 Redux 自动发出. 上述例子的 mapDispatchToProps 可改写成如下的对象形式:1
2
3
4
5
6
7
8
9
10
11// increase action creator
const increaseAction = (num = 1) => {
return {
type: 'increase',
payload: num,
};
}
const mapDispatchToProps = {
onIncreaseClick: increaseAction,
}
Provider
React-Redux 通过 Provider 组件, 让容器组件拿到 state:
1 | import { Provider } from 'react-redux'; |
Provider 组件基于 React Context:
1 | import { Context } from 'react'; |